第七章

去年今日此门中,人面桃花相映红。人面不知何处去,桃花依旧笑春风。

CoreText使用教程(三)

本篇文章为CoreText系列的第三篇,讨论下纯文本排版的一些细节,会有中文,英文,数字以及emoji表情。主要涉及到使用CTLineDraw来一行一行的绘制,而非之前CTFrameDraw一气呵成,因为CTFrameDraw会因为行高不一致导致排版不美观,CTLineDraw尽管依然存在行高不一致的问题,但却可指定每行的行高保持一致以使得排版相对美观,毕竟,英文和中文字符的ascent,descent本来就不一样。

使用CTLineDraw来一行一行的绘制时,最重要的就是在绘制前设置CoreText的坐标的Y值,这也是本文的重点所在。

本文的代码放在了github的仓库

贴一下字形图:

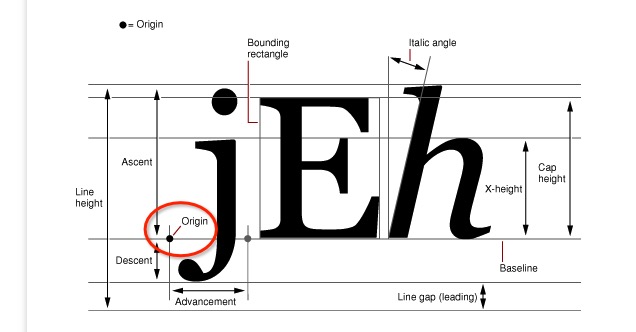
在设置坐标时,需要注意的是,CoreText的origin是在图中的baseLine处的。

分行绘制的原理主要就是从CTFrame中获得每一个CTLine对象,并针对每一个CTLine设置好该行的坐标,然后利用CTLineDraw函数进行绘制。

主要使用到的函数为:

CTFrameGetLines,传入CTFrame,返回一个装有多个CTLine对象的数组。

CTFrameGetLineOrigins,传入CTFrame,CFRange,和一个CGPoint的结构体数组指针,该函数会把每一个CTLine的origin坐标写到数组里。

CGContextSetTextPosition,设置CoreText绘制前的坐标。

CTLineDraw,绘制CTLine。

我这里分了两种实现方式

第一种只按照系统的方式来排版

自己设定一个行间距之后不去理会行高,每一个CTLine直接绘制.其实就相当于把CTFrameDraw要做的事情分步来实现而已。

其实现效果图为:

计算高度的代码:

1
2
3
4
5
6
7
8
9
10
11
12
13
14
15
16
17
18
19
20
21
22
23
24
25
26
27
28
29
30
31
32
33
34
35
36
37
38
39
40
41
42
43
44
45
46
47
48
49
50
51
52
53
54
55
56
/**
 *  高度 = 每行的asent + 每行的descent + 行数*行间距
 *  行间距为指定的数值
 *  对应第三篇博文
 */
+ (CGFloat)textHeightWithText3:(NSString *)aText width:(CGFloat)aWidth font:(UIFont *)aFont
{
    NSMutableAttributedString *content = [[NSMutableAttributedString alloc] initWithString:aText];

    // 设置全局样式
    [self addGlobalAttributeWithContent:content font:aFont];

    CTFramesetterRef framesetterRef = CTFramesetterCreateWithAttributedString((CFAttributedStringRef)content);

    CGSize suggestSize = CTFramesetterSuggestFrameSizeWithConstraints(framesetterRef, CFRangeMake(0, aText.length), NULL, CGSizeMake(aWidth, MAXFLOAT), NULL);

    CGMutablePathRef path = CGPathCreateMutable();
    CGPathAddRect(path, NULL, CGRectMake(0, 0, aWidth, suggestSize.height*10)); // 10这个数值是随便给的,主要是为了确保高度足够


    CTFrameRef frameRef = CTFramesetterCreateFrame(framesetterRef, CFRangeMake(0, aText.length), path, NULL);

    CFArrayRef lines = CTFrameGetLines(frameRef);
    CFIndex lineCount = CFArrayGetCount(lines);

    CGFloat ascent = 0;
    CGFloat descent = 0;
    CGFloat leading = 0;

    CGFloat totalHeight = 0;

    NSLog(@"计算高度开始");
    for (CFIndex i = 0; i < lineCount; i++)
    {

        CTLineRef lineRef = CFArrayGetValueAtIndex(lines, i);

        CTLineGetTypographicBounds(lineRef, &ascent, &descent, &leading);

        NSLog(@"ascent = %f,descent = %f, leading = %f",ascent,descent,leading);

        totalHeight += ascent + descent;

    }

    leading = kGlobalLineLeading; // 行间距,

    totalHeight += (lineCount ) * leading;


    NSLog(@"totalHeight = %f",totalHeight);

    NSLog(@"高度计算完毕");

    return totalHeight;
}

绘制的代码:

1
2
3
4
5
6
7
8
9
10
11
12
13
14
15
16
17
18
19
20
21
22
23
24
25
26
27
28
29
30
31
32
33
34
35
36
37
38
39
40
41
42
43
44
45
46
47
48
49
50
51
52
53
54
55
56
57
58
59
60
61
62
63
64
65
66
67
68
69
70
71
72
73
74
75
76
77
78
79
80
81
82
83
84
85
86
87
88
89
90
91
92
93
94
95
96
97
98
99
100
101
102
103
104
105
106
107
108
109
110
111
/**
 *  一行一行绘制,未调整行高
 *  对应第三篇博文里的第一个例子
 */
- (void)drawRectWithLineByLine
{
    // 1.创建需要绘制的文字
    NSMutableAttributedString *attributed = [[NSMutableAttributedString alloc] initWithString:self.text];

    // 2.设置行距等样式
    [[self class] addGlobalAttributeWithContent:attributed font:self.font];


    self.textHeight = [[self class] textHeightWithText:self.text width:CGRectGetWidth(self.bounds) font:self.font type:self.drawType];

    // 3.创建绘制区域,path的高度对绘制有直接影响,如果高度不够,则计算出来的CTLine的数量会少一行或者少多行
    CGMutablePathRef path = CGPathCreateMutable();
    CGPathAddRect(path, NULL, CGRectMake(0, 0, CGRectGetWidth(self.bounds), self.textHeight));

    // 4.根据NSAttributedString生成CTFramesetterRef
    CTFramesetterRef framesetter = CTFramesetterCreateWithAttributedString((CFAttributedStringRef)attributed);

    CTFrameRef ctFrame = CTFramesetterCreateFrame(framesetter, CFRangeMake(0, attributed.length), path, NULL);


    // 1.获取上下文
    CGContextRef contextRef = UIGraphicsGetCurrentContext();

    // 2.转换坐标系
    CGContextSetTextMatrix(contextRef, CGAffineTransformIdentity);
    CGContextTranslateCTM(contextRef, 0, self.textHeight); // 此处用计算出来的高度
    CGContextScaleCTM(contextRef, 1.0, -1.0);

    // 重置高度
    //    CGPathAddRect(path, NULL, CGRectMake(0, 0, CGRectGetWidth(self.bounds), self.textHeight));

    // 一行一行绘制
    CFArrayRef lines = CTFrameGetLines(ctFrame);
    CFIndex lineCount = CFArrayGetCount(lines);
    CGPoint lineOrigins[lineCount];

    // 把ctFrame里每一行的初始坐标写到数组里,注意CoreText的坐标是左下角为原点
    CTFrameGetLineOrigins(ctFrame, CFRangeMake(0, 0), lineOrigins);

    for (int i = 0; i < lineCount; i++)
    {
        CGPoint point = lineOrigins[i];
        NSLog(@"point.y = %f",point.y);
    }


    NSLog(@"font.ascender = %f,descender = %f,lineHeight = %f,leading = %f",self.font.ascender,self.font.descender,self.font.lineHeight,self.font.leading);

    CGFloat frameY = 0;


    for (CFIndex i = 0; i < lineCount; i++)
    {
        // 遍历每一行CTLine
        CTLineRef line = CFArrayGetValueAtIndex(lines, i);


        CGFloat lineAscent;
        CGFloat lineDescent;
        CGFloat lineLeading; // 行距
        // 该函数除了会设置好ascent,descent,leading之外,还会返回这行的宽度
        CTLineGetTypographicBounds(line, &lineAscent, &lineDescent, &lineLeading);
        NSLog(@"lineAscent = %f",lineAscent);
        NSLog(@"lineDescent = %f",lineDescent);
        NSLog(@"lineLeading = %f",lineLeading);


        CGPoint lineOrigin = lineOrigins[i];

        NSLog(@"i = %ld, lineOrigin = %@",i,NSStringFromCGPoint(lineOrigin));


        // 微调Y值,需要注意的是CoreText的Y值是在baseLine处,而不是下方的descent。
        // lineDescent为正数,self.font.descender为负数
        if (i > 0)
        {
            // 第二行之后需要计算
            frameY = frameY - kGlobalLineLeading - lineAscent;

            lineOrigin.y = frameY;

        } else
        {
            // 第一行可直接用
            frameY = lineOrigin.y;
        }


        NSLog(@"frameY = %f",frameY);

        // 调整坐标
        CGContextSetTextPosition(contextRef, lineOrigin.x, lineOrigin.y);
        CTLineDraw(line, contextRef);

        // 微调
        frameY = frameY - lineDescent;

        // 该方式与上述方式效果一样
//        frameY = frameY - lineDescent - self.font.descender;
    }


    CFRelease(path);
    CFRelease(framesetter);
    CFRelease(ctFrame);
}

另一种实现方式是指定每一行的高度为固定值

其效果图为:

计算高度代码:

1
2
3
4
5
6
7
8
9
10
11
12
13
14
15
16
17
18
19
20
21
22
23
24
25
26
27
28
29
30
31
32
33
34
35
36
37
38
39
/**
 *  高度 = 每行的固定高度 * 行数
 */
+ (CGFloat)textHeightWithText2:(NSString *)aText width:(CGFloat)aWidth font:(UIFont *)aFont
{
    NSMutableAttributedString *content = [[NSMutableAttributedString alloc] initWithString:aText];

    // 给字符串设置字体行距等样式
    [self addGlobalAttributeWithContent:content font:aFont];

    CTFramesetterRef framesetterRef = CTFramesetterCreateWithAttributedString((__bridge CFAttributedStringRef)content);

    // 粗略的高度,该高度不准,仅供参考
    CGSize suggestSize = CTFramesetterSuggestFrameSizeWithConstraints(framesetterRef, CFRangeMake(0, content.length), NULL, CGSizeMake(aWidth, MAXFLOAT), NULL);

    NSLog(@"suggestHeight = %f",suggestSize.height);


    CGMutablePathRef pathRef = CGPathCreateMutable();
    CGPathAddRect(pathRef, NULL, CGRectMake(0, 0, aWidth, suggestSize.height));

    CTFrameRef frameRef = CTFramesetterCreateFrame(framesetterRef, CFRangeMake(0, content.length), pathRef, NULL);

    CFArrayRef lines = CTFrameGetLines(frameRef);
    CFIndex lineCount = CFArrayGetCount(lines);

    NSLog(@"行数 = %ld",lineCount);


    // 总高度 = 行数*每行的高度,其中每行的高度为指定的值,不同字体大小不一样
    CGFloat accurateHeight = lineCount * (aFont.pointSize * kPerLineRatio);

    CGFloat height = accurateHeight;

    CFRelease(pathRef);
    CFRelease(frameRef);

    return height;
}

绘制的代码:

1
2
3
4
5
6
7
8
9
10
11
12
13
14
15
16
17
18
19
20
21
22
23
24
25
26
27
28
29
30
31
32
33
34
35
36
37
38
39
40
41
42
43
44
45
46
47
48
49
50
51
52
53
54
55
56
57
58
59
60
61
62
63
64
65
66
67
68
69
70
71
72
73
74
75
76
77
78
79
80
81
82
83
84
85
86
87
88
89
90
91
92
93
94
95
96
#pragma mark - 一行一行绘制,行高确定,行与行之间对齐
- (void)drawRectWithLineByLineAlignment
{
    // 1.创建需要绘制的文字
    NSMutableAttributedString *attributed = [[NSMutableAttributedString alloc] initWithString:self.text];

    // 2.设置行距等样式
    [[self class] addGlobalAttributeWithContent:attributed font:self.font];


    self.textHeight = [[self class] textHeightWithText:self.text width:CGRectGetWidth(self.bounds) font:self.font type:self.drawType];

    // 3.创建绘制区域,path的高度对绘制有直接影响,如果高度不够,则计算出来的CTLine的数量会少一行或者少多行
    CGMutablePathRef path = CGPathCreateMutable();
    CGPathAddRect(path, NULL, CGRectMake(0, 0, CGRectGetWidth(self.bounds), self.textHeight*2));

    // 4.根据NSAttributedString生成CTFramesetterRef
    CTFramesetterRef framesetter = CTFramesetterCreateWithAttributedString((CFAttributedStringRef)attributed);

    CTFrameRef ctFrame = CTFramesetterCreateFrame(framesetter, CFRangeMake(0, attributed.length), path, NULL);


    // 获取上下文
    CGContextRef contextRef = UIGraphicsGetCurrentContext();

    // 转换坐标系
    CGContextSetTextMatrix(contextRef, CGAffineTransformIdentity);
    CGContextTranslateCTM(contextRef, 0, self.textHeight); // 此处用计算出来的高度
    CGContextScaleCTM(contextRef, 1.0, -1.0);

    // 重置高度
    CGPathAddRect(path, NULL, CGRectMake(0, 0, CGRectGetWidth(self.bounds), self.textHeight));

    // 一行一行绘制
    CFArrayRef lines = CTFrameGetLines(ctFrame);
    CFIndex lineCount = CFArrayGetCount(lines);
    CGPoint lineOrigins[lineCount];

    // 把ctFrame里每一行的初始坐标写到数组里,注意CoreText的坐标是左下角为原点
    CTFrameGetLineOrigins(ctFrame, CFRangeMake(0, 0), lineOrigins);

    for (int i = 0; i < lineCount; i++)
    {
        CGPoint point = lineOrigins[i];
        NSLog(@"point.y = %f",point.y);
    }


    NSLog(@"font.ascender = %f,descender = %f,lineHeight = %f,leading = %f",self.font.ascender,self.font.descender,self.font.lineHeight,self.font.leading);

    CGFloat frameY = 0;


    NSLog(@"self.textHeight = %f,lineHeight = %f",self.textHeight,self.font.pointSize * kPerLineRatio);

    for (CFIndex i = 0; i < lineCount; i++)
    {
        // 遍历每一行CTLine
        CTLineRef line = CFArrayGetValueAtIndex(lines, i);

        CGFloat lineAscent;
        CGFloat lineDescent;
        CGFloat lineLeading; // 行距
        // 该函数除了会设置好ascent,descent,leading之外,还会返回这行的宽度
        CTLineGetTypographicBounds(line, &lineAscent, &lineDescent, &lineLeading);
        NSLog(@"lineAscent = %f",lineAscent);
        NSLog(@"lineDescent = %f",lineDescent);
        NSLog(@"lineLeading = %f",lineLeading);


        CGPoint lineOrigin = lineOrigins[i];

        NSLog(@"i = %ld, lineOrigin = %@",i,NSStringFromCGPoint(lineOrigin));


        // 微调Y值,需要注意的是CoreText的Y值是在baseLine处,而不是下方的descent。

        CGFloat lineHeight = self.font.pointSize * kPerLineRatio;
        frameY = self.textHeight - (i + 1)*lineHeight - self.font.descender;


        NSLog(@"frameY = %f",frameY);

        lineOrigin.y = frameY;

        // 调整坐标
        CGContextSetTextPosition(contextRef, lineOrigin.x, lineOrigin.y);
        CTLineDraw(line, contextRef);

    }

    CFRelease(path);
    CFRelease(framesetter);
    CFRelease(ctFrame);

}

设置字符串全局样式的代码:

1
2
3
4
5
6
7
8
9
10
11
12
13
14
15
16
17
18
19
20
21
22
23
24
25
26
27
28
29
30
31
32
33
34
35
36
37
38
39
40
41
42
43
44
45
46
47
48
49
50
51
52
53
54
55
56
57
58
59
60
61
#pragma mark - 工具方法
#pragma mark 给字符串添加全局属性,比如行距,字体大小,默认颜色
+ (void)addGlobalAttributeWithContent:(NSMutableAttributedString *)aContent font:(UIFont *)aFont
{
    CGFloat lineLeading = kGlobalLineLeading; // 行间距

    const CFIndex kNumberOfSettings = 2;

#warning 这几个属性有待研究

    CTParagraphStyleSetting lineBreakStyle;
    CTLineBreakMode lineBreakMode = kCTLineBreakByWordWrapping;
    lineBreakStyle.spec = kCTParagraphStyleSpecifierLineBreakMode;
    lineBreakStyle.valueSize = sizeof(CTLineBreakMode);
    lineBreakStyle.value = &lineBreakMode;

    CTParagraphStyleSetting lineSpaceStyle;
    CTParagraphStyleSpecifier spec;
    spec = kCTParagraphStyleSpecifierLineSpacingAdjustment;
//    spec = kCTParagraphStyleSpecifierMaximumLineSpacing;
//    spec = kCTParagraphStyleSpecifierMinimumLineSpacing;
//    spec = kCTParagraphStyleSpecifierLineSpacing;

    lineSpaceStyle.spec = spec;
    lineSpaceStyle.valueSize = sizeof(CGFloat);
    lineSpaceStyle.value = &lineLeading;

    CTParagraphStyleSetting lineHeightStyle;
    lineHeightStyle.spec = kCTParagraphStyleSpecifierMinimumLineHeight;
    lineHeightStyle.valueSize = sizeof(CGFloat);
    lineHeightStyle.value = &lineLeading;

    // 结构体数组
    CTParagraphStyleSetting theSettings[kNumberOfSettings] = {

        lineBreakStyle,
        lineSpaceStyle,
//        lineHeightStyle
    };

    CTParagraphStyleRef theParagraphRef = CTParagraphStyleCreate(theSettings, kNumberOfSettings);


    // 将设置的行距应用于整段文字
    [aContent addAttribute:NSParagraphStyleAttributeName value:(__bridge id)(theParagraphRef) range:NSMakeRange(0, aContent.length)];


    CFStringRef fontName = (__bridge CFStringRef)aFont.fontName;
    CTFontRef fontRef = CTFontCreateWithName(fontName, aFont.pointSize, NULL);

    // 将字体大小应用于整段文字
    [aContent addAttribute:NSFontAttributeName value:(__bridge id)fontRef range:NSMakeRange(0, aContent.length)];

    // 给整段文字添加默认颜色
    [aContent addAttribute:NSForegroundColorAttributeName value:[UIColor blackColor] range:NSMakeRange(0, aContent.length)];


    // 内存管理
    CFRelease(theParagraphRef);
    CFRelease(fontRef);
}

两个全局变量:

1
2
3
4
5
// 行距
const CGFloat kGlobalLineLeading = 5.0;

// 在15字体下,比值小于这个计算出来的高度会导致emoji显示不全
const CGFloat kPerLineRatio = 1.4;

控制器里的代码:

1
2
3
4
5
6
7
8
9
10
11
12
13
14
15
16
17
18
- (void)viewDidLoad {
    [super viewDidLoad];
    // Do any additional setup after loading the view, typically from a nib.

    NSString *content = @"我自横刀向天笑,去留肝胆两昆仑。--谭嗣同同学你好啊。This is my first CoreText demo,how are you ?I love three things,the sun,the moon,and you.the sun for the day,the moon for the night,and you forever.😳😊😳😊😳😊😳去年今日此门中,人面桃花相映红。人面不知何处去,桃花依旧笑春风。😳😊😳😊😳😊😳少年不知愁滋味,爱上层楼,爱上层楼,为赋新词强说愁。56321363464.而今识尽愁滋味,欲说还休,欲说还休,却道天凉好个秋。123456,7890,56321267895434。缺月挂疏桐,漏断人初静。谁见幽人独往来,缥缈孤鸿影。惊起却回头,有恨无人省。捡尽寒枝不肯栖,寂寞沙洲冷。";

    self.coreTextView.backgroundColor = [UIColor grayColor];
    self.coreTextView.font = [UIFont systemFontOfSize:15];
    self.coreTextView.text = content;

    self.coreTextView.drawType = HFDrawTextLineByLineAlignment; // 设置该值即可切换


    CGFloat height = [HFCoreTextView textHeightWithText:content width:CGRectGetWidth(self.coreTextView.frame) font:self.coreTextView.font type:self.coreTextView.drawType];

    self.contentViewHeightConstraint.constant = height;

}

内部封装的计算高度的代码:

1
2
3
4
5
6
7
8
9
10
11
12
13
14
15
16
17
18
19
20
21
22
#pragma mark - 计算高度
+ (CGFloat)textHeightWithText:(NSString *)aText width:(CGFloat)aWidth font:(UIFont *)aFont type:(HFDrawType)drawType
{
    if (drawType == HFDrawPureText)
    {
        return 400;

    } else if (drawType == HFDrawTextAndPicture)
    {
        return 400*3;

    } else if (drawType == HFDrawTextLineByLine)
    {
        return [self textHeightWithText3:aText width:aWidth font:aFont];

    } else if (drawType == HFDrawTextLineByLineAlignment)
    {
        return [self textHeightWithText2:aText width:aWidth font:aFont];
    }

    return 0;
}

要注意的是,以上不同绘制方式所需要的高度是不一样的,这点在demo中有做区别。我使用了type来区分不同的高度计算方式。同时,第一种方式,是有设置CTLine之间的行间距的,我这里设置的是5。而第二种方式是没有设置行间距的,只设置了每行的高度。

为了方便两种方式的区别,这里来一张整合图吧:

第一种方式为左图,第二种方式为右图。尽管第二种方式有额外的工作量,比如上面的1.4这个全局变量,改变字体排版可能会变化等,但整体上还是觉得第二种排版方式美观一些。如果有同学知道其他方便的排版方式,也烦请告知下,thanks。

在学习分行绘制的过程中得到了泰尼叔Naituw的帮助,这里一并表示感谢。

参考链接:

1.CoreText入门

2.如何使用Core Text计算一段文本绘制在屏幕上之后的高度

3.Core Text在绘制的时候碰到行间距问题的原因及解决办法